
How to Plan Your House Layout Before You Break Ground
The house layout decisions you make before construction begins will shape how the finished building functions for decades. Get them right and the house works efficiently, feels spacious and adapts to how you actually live. Get them wrong and you’re stuck with a kitchen that backs up to the master bedroom, a front door that opens into a wall or a staircase that burns 200 square feet you needed for something else.
Most layout mistakes aren’t random — they follow predictable patterns. This guide walks through the layout planning process in order, explains the common mistakes at each step and shows what “right” looks like before a single wall goes up.

Step 1: Start With the Site, Not the House
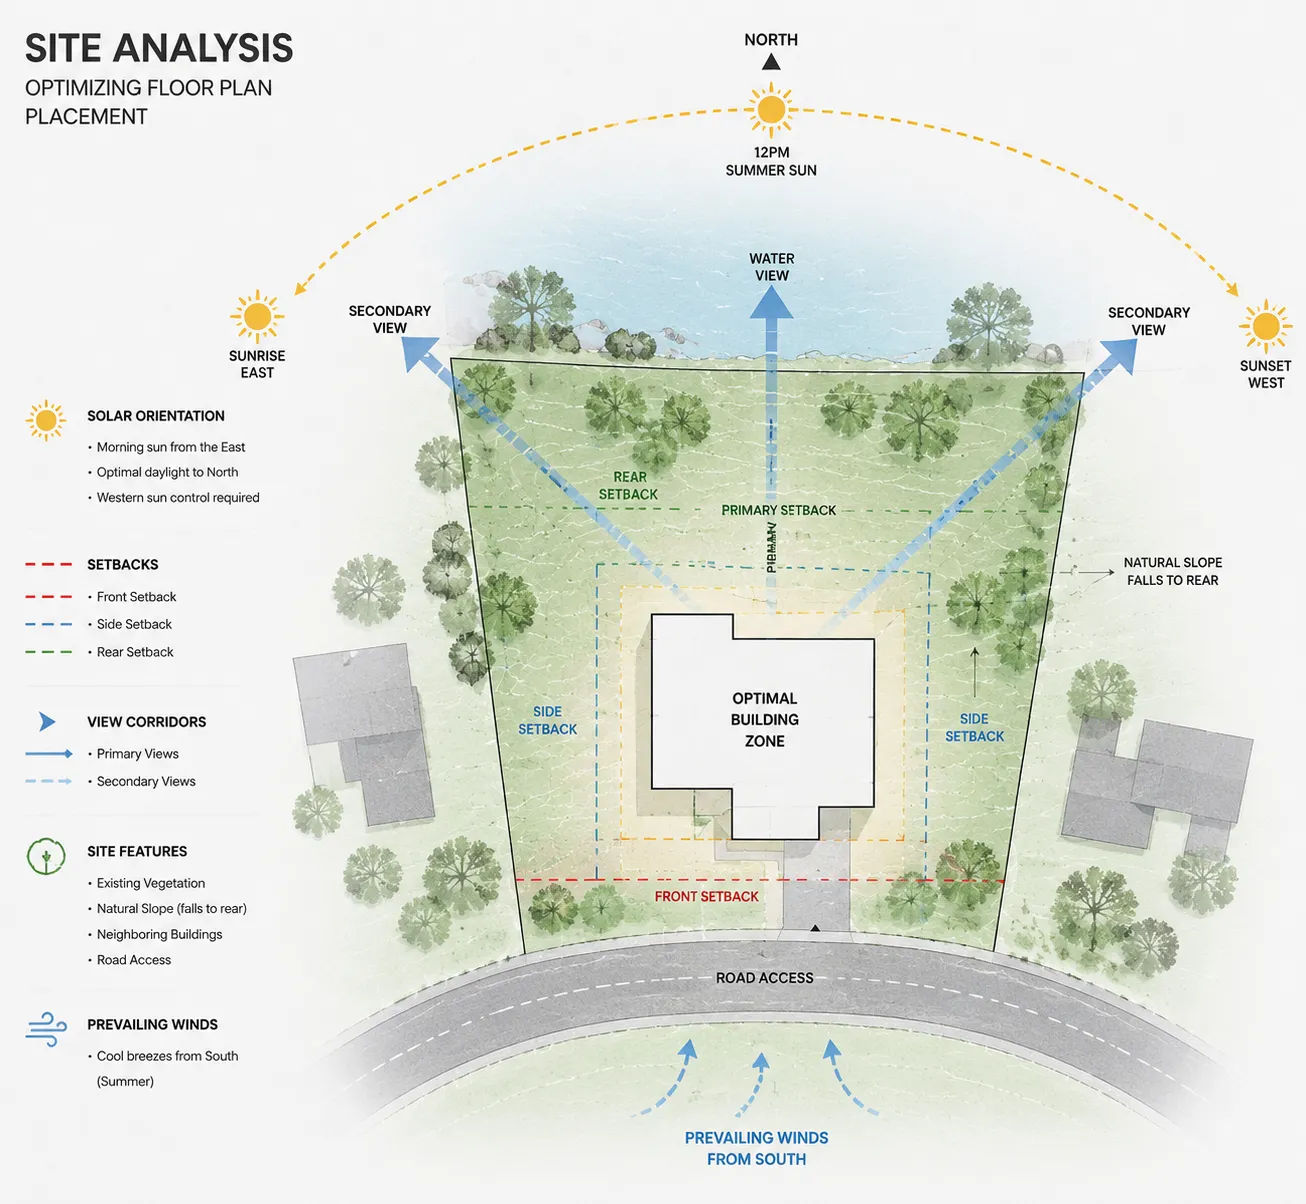
Before you design a floor plan, understand the land it’s going on.
Orientation matters. A house positioned without regard for sun angle can result in bedrooms that bake in the afternoon, a living room that never gets natural light or a kitchen that’s dark by 3pm. In most of the continental U.S., living spaces benefit from south-facing glazing in winter. Bedrooms benefit from east-facing orientation for morning light without afternoon heat gain.
Wind, views and privacy matter too. If there’s a view worth capturing, the floor plan should capture it. If a neighboring property is close to the east boundary, window placement on that wall needs to account for privacy.
Street access and arrival sequence shape the layout more than most clients realize. Where does a car park? Where does a person walk from the parking area to the front door? What do they see when they enter? These circulation questions have to be resolved before you figure out where rooms go.
Zoning constraints — setbacks, lot coverage maximums, height limits — define the building envelope before design begins. Architectural design services typically begin with a site analysis that maps these constraints onto the lot.
Step 2: Define the Program Before You Start Drawing
“Program” is architect-speak for the list of spaces a building needs to contain. Writing a clear program before layout begins prevents the most common mistake in residential design: starting with a layout and then trying to fit the program into it.
A clear program includes: - Number and type of spaces (bedrooms, bathrooms, kitchen, living, dining, study, storage) - Required adjacencies (master bedroom adjacent to master bath; pantry adjacent to kitchen) - Required separations (home office needs acoustic separation from living areas; guest bedroom away from master) - Approximate sizes (at least in terms of relative priority — “larger living area, smaller formal dining”) - Special requirements (accessibility needs, home office requirements, dedicated gym or studio space)
Writing this down before sketching anything forces clarity about what the house actually needs to do. It also gives you a checklist to evaluate layout options against — instead of judging by feel, you can ask “does this layout satisfy the program?”
Step 3: Organize Zones, Then Rooms
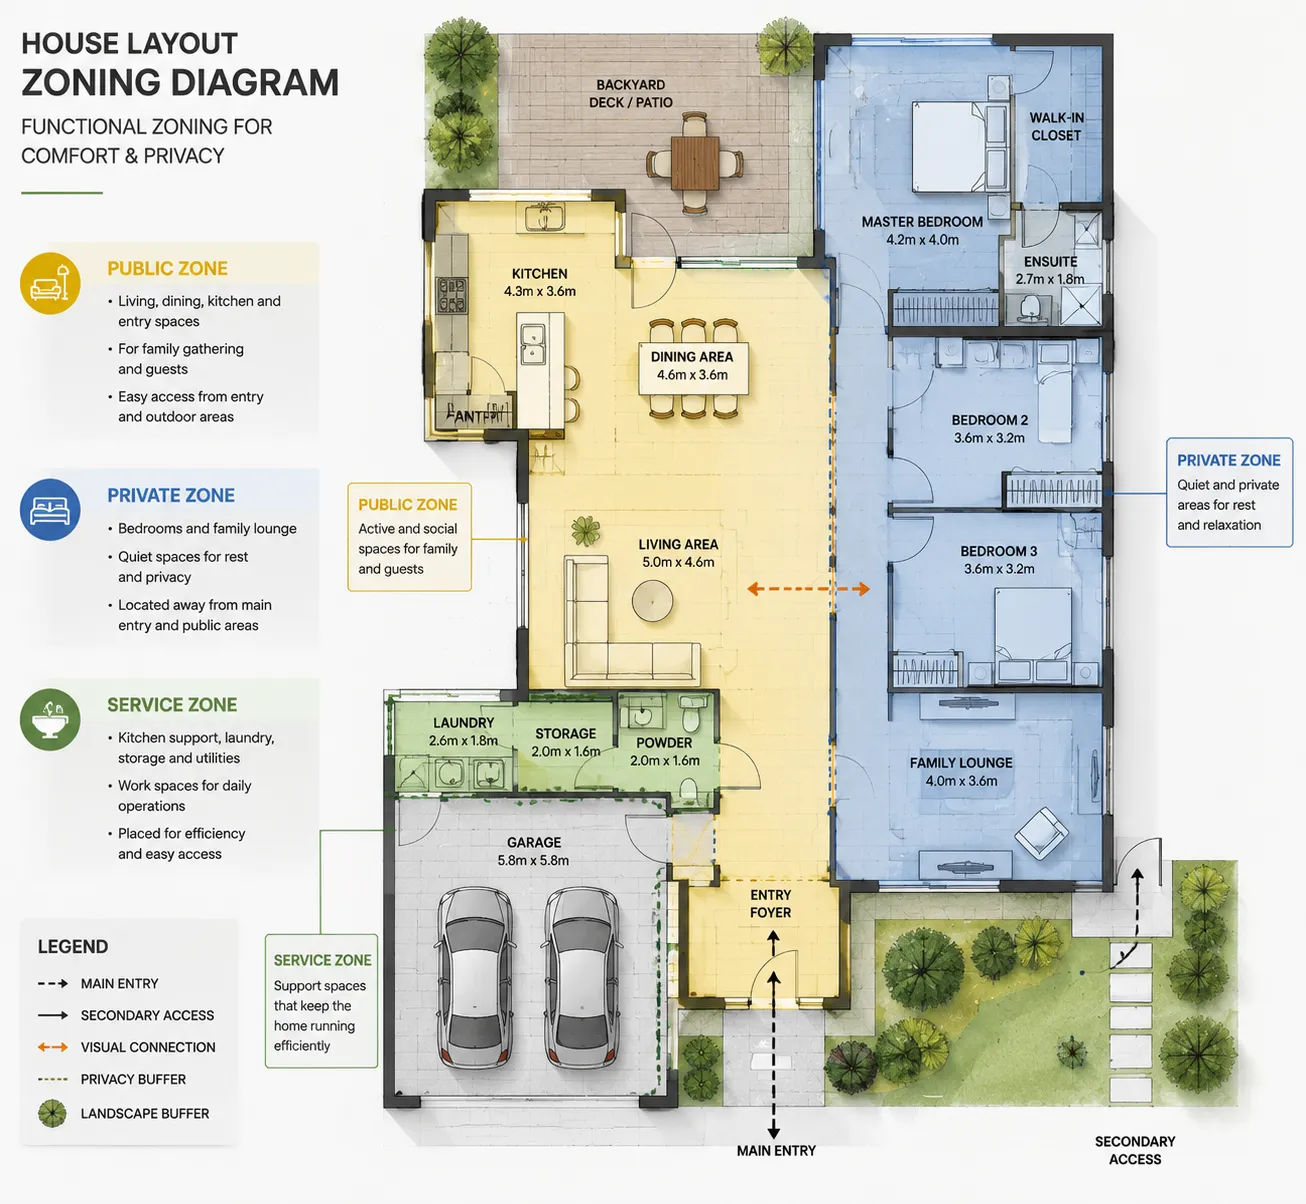
Good house layouts are organized around zones — groups of functionally related spaces — before individual rooms are placed.
The three primary residential zones are: - Public zone: Entry, living, dining, kitchen — spaces for living and entertaining - Private zone: Bedrooms, bathrooms, study — spaces for rest and personal use - Service zone: Garage, laundry, mechanical, storage — back-of-house functions
These zones should have a clear organizational logic relative to each other and to the site. Public zones typically benefit from south/east solar exposure and proximity to the main entry. Private zones should be buffered from street noise and separated from the public zone. Service zones can tolerate north exposure and less desirable site positions.
Once zones are placed, rooms within each zone can be positioned. This approach prevents the common mistake of placing rooms based on what fits geometrically rather than what makes functional sense.
Step 4: Sort Out Circulation
Circulation — the paths people take through a house — is where bad layouts fail. You can have all the right rooms in all the right zones and still end up with a layout that feels awkward because the paths between spaces are inefficient or require passing through rooms that shouldn’t be traversed.
Rules of thumb that prevent common circulation problems: - Avoid dead ends. Layouts where you have to retrace your steps to get from one area to another feel smaller and less functional than they are. - Minimize crossing traffic. The path from the garage to the kitchen shouldn’t cross the formal living room. The path from the master bedroom to the kitchen shouldn’t pass through children’s bedrooms. - Protect private zones. Bedrooms should be accessible without requiring passage through major living spaces. - Stairs shouldn’t be an afterthought. On multi-story layouts, stair placement affects circulation on every floor simultaneously. Poorly placed stairs create cascade problems. House layout planning for multi-unit buildings is especially sensitive to stair and vertical circulation placement.
Step 5: Check Daylight and Ventilation
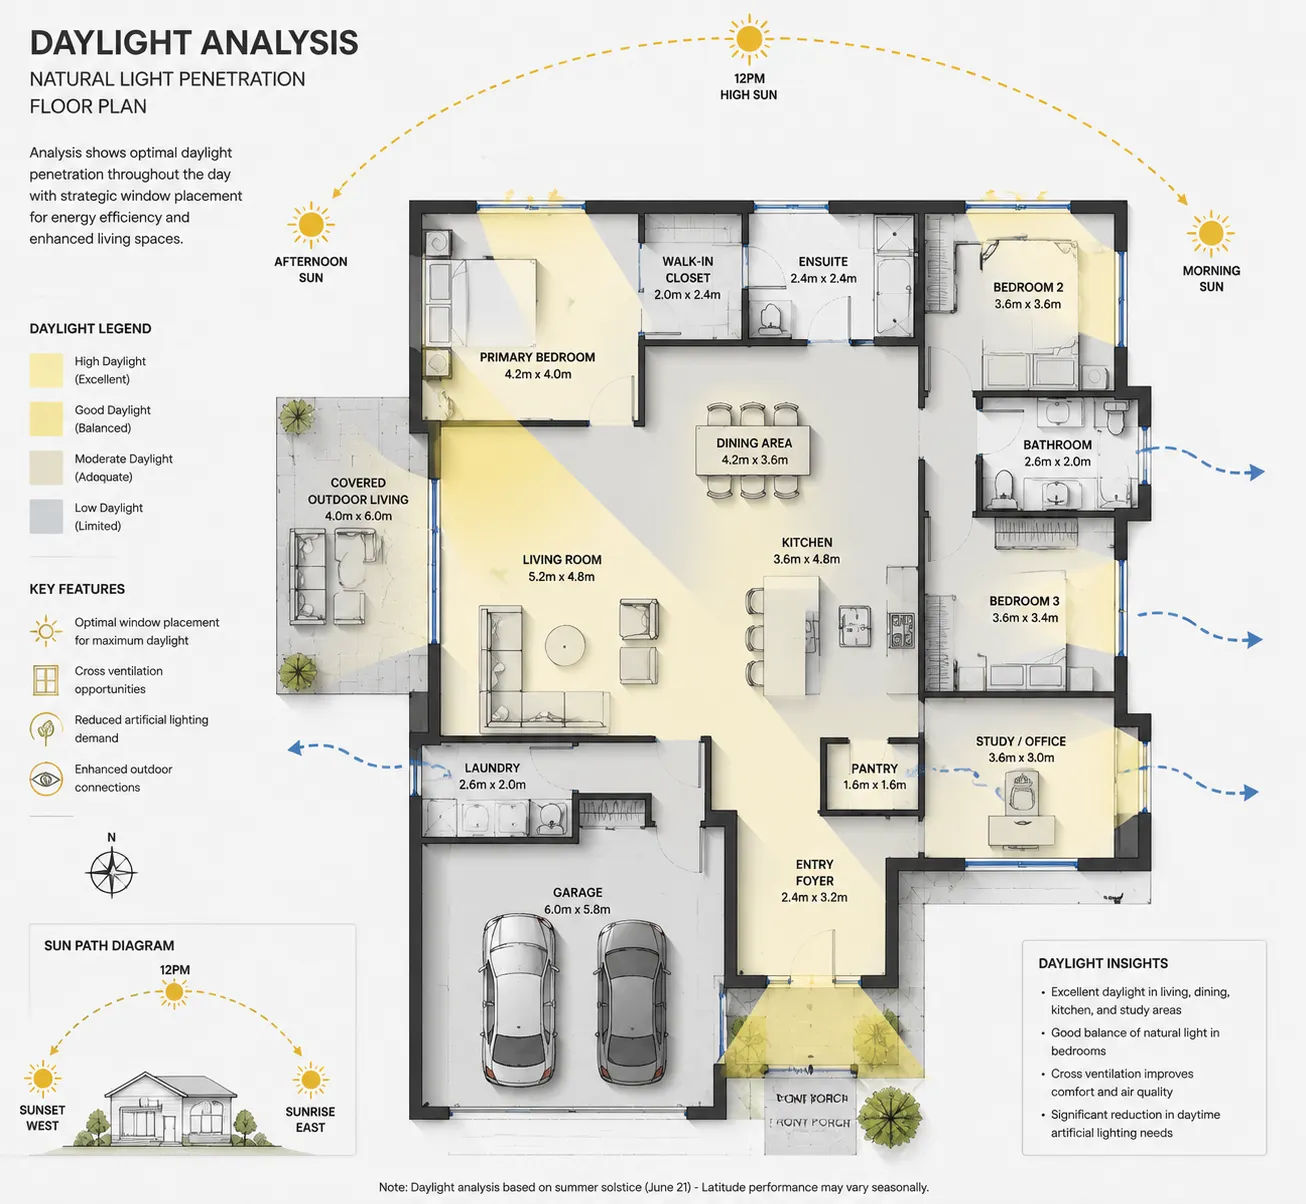
Every habitable room in a residential building needs access to natural light and natural ventilation. This sounds obvious until you’re looking at a layout that has placed three interior bathrooms in a row or put a bedroom with its only window facing into an interior courtyard at the wrong angle.
Minimum code requirements for daylight and ventilation are specified in your jurisdiction’s building code. But meeting minimums doesn’t guarantee a comfortable space — a bedroom with one tiny code-minimum window facing north is technically compliant and practically depressing.
When reviewing a layout, check: Does every habitable room have at least one exterior wall? Is the window placement appropriate for daylight quality and privacy? Can windows be opened for cross-ventilation in warm months?
Step 6: Review Structural Implications
A layout that’s beautiful draftingly might be difficult or expensive to build structurally. Long open spans without intermediate support require larger beams — which affects ceiling height or costs more. Stacked bathrooms simplify plumbing; offset bathrooms complicate it.
You don’t need to be a structural engineer to catch structural issues early. The key question is: where do the loads go? Walls above rooflines, walls on upper floors that don’t have walls below them on the ground floor and large open-span spaces are places where structural implications need to be thought through before the layout is finalized.
Step 7: Get It Into Proper Drawings Before You Build
A sketch layout is a starting point. It’s not a house plan.
Before construction begins — and before permits are sought — the layout needs to be translated into accurate, scaled technical drawings that show precisely how the building will be constructed. Architectural drafting services convert the resolved layout concept into permit-ready documentation, which is what allows the project to move to the construction phase.
This step isn’t optional. It’s also where most of the latent problems in a hand-sketched layout get caught — because the discipline of drawing to scale with real dimensions reveals conflicts that look fine in a rough sketch.

